Wednesday, April 29, 2009

Tortellini Soup


It's been rainy and cold recently so I decided a simple soup was in order. It had been a while since I'd made this one and with a busy week, this was something good to have around the house. Plus, I had some carrots and celery to use, so there we go!

I don't know the original source of this recipe. I got it from my mom and I'm not sure where she got it. Either way, I've (of course) adapted it a bit, so it's more my own now anyway. But if I find the source, I will certainly add credit!

Ingredients:
  • 6 cups reduced sodium chicken broth
  • 1-2 cloves garlic, crushed (or 1-2 tsp. minced jarred garlic)
  • 3 large carrots, peeled and chopped
  • 4 celery stalks, chopped
  • 2 1/2 cups cheese tortellini (see note)
  • Salt & pepper to taste
  • Sprinkle red pepper flakes (optional, see note)
Directions:

Add chicken broth to a large pot and bring to boil over medium-high heat. Meanwhile, chop celery and carrots. Once boiling, add carrots, celery, garlic, a bit of salt & pepper and red pepper flakes if desired, reduce heat slightly, cover and simmer about 15 min., stirring occasionally. Add tortellini and cook according to package (about 8 min. more), stirring occasionally.

Serve with bread. Makes about 6 servings.

Notes:

One of the biggest keys to making this dish low in calories/fat is the tortellini used. When checking out a few different brands in the store, I noticed a wide variety in calories and fat content for about the same size serving. I ended up getting the three cheese tortellini Buitoni brand9 oz. (235 g) size, which equaled exactly 2 1/2 cups of tortellini. Nutritional information below.

I like to add some red pepper flakes to this to give it some heat. Use caution in adding too much, or it will overpower the dish, since it's broth-based and there isn't much else in the simple soup to mask them.

For leftovers, you will notice a good majority of the broth gets sucked up by the tortellini. It generally gets soupier when you reheat but if you need a bit more, add a bit of water before reheating.

Review:

This is a really quick soup to make, which is nice. Plus, I don't really think it has a "season". Although I might not make it in the summer, it was nice on a cold, rainy spring day. I love that we can have some tortellini for not a ton of calories. It hits the spot!

Nutritional Information: Makes about 6 servings.

Per serving:
161.5 calories
4.3 grams of fat (2.1 saturated)
2.8 grams dietary fiber

Buitoni tortellini: Serving size 1 cup. 330 calories, 9 grams fat (3 saturated), 4 grams dietary fiber. This is incorporated into the total above but might help when shopping for the right pasta to use.

Enjoy!

Tuesday, April 28, 2009

I sent it back

I recently went out to dinner for a friend's birthday. I know for many people, eating out can be the most challenging part of a weight loss plan or even sticking with healthy eating. If you read my original post, I mention I consider myself Sally from the movie When Harry Met Sally.

This particular episode of eating out was simple. I ordered an ahi tuna sandwich that didn't come loaded in sauces, etc. There was a wasabi sauce on the side. And I was having a bit of a splurge night, so I got the tortilla chips for the side instead of a salad (however, I will add that I did not eat them all...that's portion control, which is an entirely separate topic that involves a serious discussion on willpower!). I actually kind of laughed as I was ordering, because I only had one small simple request: no butter on my bread.

You see, while I was carefully reading the menu, I noticed a certain "code"...grilled bun...otherwise known as the bread is buttered. Typically, you'd think if a sandwich already comes with a sauce (in this case wasabi aioli...most often mayo, which I now always leave off), then the bread wouldn't need butter in addition...WRONG! Most of the time the bread is still buttered. In my opinion that's overkill, but maybe that's because I've gotten used to things not needing butter. The flavor of the food should speak for itself...why do we need to drown it in butter? Don't get me wrong, in some dishes butter is a logical choice (in moderation, of course)...but in my opinion, when trying to have a tasty splurge, I don't need the butter.

So, when I ordered, all I had was a simple..."could I please have my bun without butter?" Our server nodded her head, said "sure" and that was that....until my sandwich came, of course.

While everyone else was arranging their plates, unrolling their silverware and preparing to dig in, I quickly seized the opportunity to inspect my sandwich before the server could leave. And sure enough, there was my tasty-looking tuna sitting open-faced on a bun, glistening in melted butter.

So this is the part where it helps to not be shy. I got the server's attention and simply stated (while handing her the plate), "could I get this on a bun without butter?" And there. I sent my food back. I wasn't rude about it, I just sent it back. And my food returned in a few minutes on a bun without butter. Perfect, that's all I need. I can now enjoy my food and a.) not feel entirely guilty doing so and b.) not be incredibly angry that the kitchen couldn't accomodate one simple request.

I can't tell you how many times I've ordered something in a special manner and they get it wrong. Who knows where the message is being lost, but I always ask if they CAN prepare it that way, since some items are often already prepared (this is often the case with vegetables that might already be cooked in oil or butter, so I ask if it's possible to get something steamed without butter or oil. If not, then it's usually the side salad).

So my point is this: Don't be afraid to send a meal back if the kitchen doesn't make it to your liking. There's no need to be rude about it, especially since we really have no idea if the server didn't pass the message forward or if the kitchen ignored/forgot about the request. It took me a while to come to terms with this, especially since I'm not a picky eater so I wasn't accustomed to ordering things in a special manner...and I generally didn't like to draw attention to what I was ordering. BUT, I have learned that I do have a say what I put in my body and if a restaurant can't accomodate that, I should take my business elsewhere. That may sound a bit snobby, but if I don't take care of myself and make that choice, no one is going to make it for me. Plenty of people have severe allergies to food and need things prepared in a special manner, so I consider this along those lines.

Don't be shy. Don't be rude. It never hurts to ask. You never know...you just might empower someone else to order their meal in a way that suits them when they might not have otherwise.


Saturday, April 25, 2009

Crockpot Thai Chicken: simple and not boring


Some people mention when they start WW or a healthy eating routine that they get sick of eating chicken all the time. Thankfully, this blog will NOT be about a million and a half chicken recipes. Even so, with a bit of creativity, chicken doesn't have to be boring...there are a ton of ways to make it and incorporate a variety of flavors and still have a low fat dish.

One thing I've learned through this journey of losing weight and now keeping the weight off, is to make sure to vary what I cook and eat. A little creativity goes a long way without a ton of effort. If we eat the same thing everyday of course we're going to get bored and eventually quit and go back to our old habits. And who could blame us?

One thing that helped me along this path is that I'm a bit of a dork about finding new things to try. I'm always looking for something new I can make that's tasty and fits my eating plan. Even if that's not you, if you are getting bored or see yourself slipping, you might just need a bit of a change to renew your efforts. It might help to consider a couple of different items you could pick up at the grocery store this week to try something different. Even buying a different kind of fruit for a snack can be a start.

BUT, this entry is a chicken recipe. And honestly, the only reason chicken is showing up so early in this blog is because I had a lime to use before it went bad. However, chicken can be a lifesaver especially when we're short on time. So can the crock pot. And this is a good option.

Ingredients:
Plus the chicken, of course.
  • 2 lbs boneless skinless chicken breasts, frozen (about 4 breasts)
  • 1 cup hot salsa
  • 1/4 cup, heaping, reduced fat peanut butter
  • 1Tbsp reduced sodium soy sauce
  • Juice of 1/2 a fresh lime (or 2 Tbsp. lime juice)
  • 2-3 tsp. freshly grated ginger (I mince mine)
  • 1 jalapeno pepper, seeded and chopped (optional)
  • Fresh cilantro
Directions:

Spray the crock pot with cooking spray and add chicken. In a separate bowl, mix together salsa, peanut butter, soy sauce, lime juice, ginger and jalapeno. Pour over chicken. Mix up a bit so sauce is distributed throughout the crock pot. Cook on low 6-8 hours (mine is usually plenty done after 6 hours).

Garnish with fresh cilantro and serve over brown rice.

Makes 4-8 servings (see nutritional information).

Notes:

We like our food a bit spicier, so if you don't prefer it that way, you can leave out the jalapeno and use a medium salsa. Even with the hot salsa, if you add more lime juice, it will even out and be less spicy.

I serve this with minute brown rice, cooked according to package directions. I cook it in chicken broth instead of water to give it more flavor. Season with some salt, pepper and chopped green onions after it's done cooking.

A great side dish is steamed green beans with some salt, pepper and a bit of jarred garlic.

Variation: Once cooked, let chicken cool a bit in the crock pot, take two forks and shred the chicken. As leftovers, it makes a great base for a wrap.

Results: Tasty! I've made this meal a number of times and it is awesome to throw in the crock pot in the morning for a weeknight meal. When we first made it, I thought the salsa and peanut butter looked nasty together, but it tastes great when cooked...so don't be grossed out as you're stirring the ingredients! This dish has great flavor and is certainly a step away from boring old chicken. We really like this one and I make it frequently. Another nice thing about it is the ingredients are easy to keep on-hand, so it's a great choice when I haven't quite planned ahead.

Nutritional information:

At 4 servings (using 4 chicken breasts totaling about 2 lbs):

362.7 calories
9 grams of fat
2.1 grams of fiber

About 8 WW points. If using smaller chicken breasts, this could reduce the points value.

Alternative: Shred the chicken and then I estimate it makes about 8 servings (easier to divide!). At 8 servings, it's:

181.3 calories
4.5 grams of fat
1 gram dietary fiber

About 4 WW points.

Enjoy!

Sunday, April 19, 2009

Grilled Pork Tenderloin with Blackberry Red Wine Reduction Sauce

Blackberries were recently on sale, so I picked some up, intending to eat them with yogurt for breakfast. Then I remembered a few weeks ago I had been looking at this blueberry-bourbon pork recipe but never had a chance to give it a try.

So why not try something similar with blackberries? I had the idea earlier in the week and have been waiting all week to give it a try...it was worth the wait. Busy week, so I'm glad I waited until Saturday when I had the time to make this dish the right way, because IT. WAS. GOOD. Success at my first attempt at any sort of a "reduction"!

This recipe takes a bit of prepping for the pork tenderloin so plan ahead...but it's worth it. Plus, this would make an excellent dinner party dish. Oh yeah, and it's low-fat and full of flavor...if your dinner guests aren't into healthy eating they'll never know!

Ingredients:

Pork:
  • 1 unseasoned pork tenderloin, thawed
  • Salt
  • Pepper
  • Rosemary
  • Garlic powder
Blackberry sauce:
  • 1 shallot, minced
  • 2 tsp. olive oil
  • 2 cups red wine (I used a Cabernet-Sauvingnon)
  • 2 cups fresh blackberries (about 2 pints)
  • 1 tsp. lemon zest
  • Juice from one lemon
  • 2 heaping Tbsp. seedless blackberry preserves, no sugar added
  • 3 sprigs fresh thyme
  • 2 tsp. sugar (see note in directions)
  • salt & pepper to taste
Instructions:

Pork:


Preparation: The night before you plan to make the meal (or even the morning-of if it's for dinner), rub the thawed pork on all sides with salt, black pepper, garlic powder and rosemary (fresh would be great but I had dried in stock). Since there's already a decent amount of sodium in the pork, it doesn't need a lot of salt. Wrap the tendrloin in clear plastic wrap and store in a container in the refrigerator.

When ready to prepare the meal, take out the pork and it let come to room temperature. Meanwhile, preheat the grill (we use a charcoal grill, so I'm not sure of the temperature if you're using a gas grill).

Once hot, grill the pork 15 min. on each side, about 30 min. total. Some recipes suggest searing the pork for a couple of minutes on either side and then cooking it through on a medium heat. It is recommended to cook pork to 160 degrees, but be careful not to overcook it.

When cooked, remove from grill, let rest for 5-10 min. and slice.

To make pork in oven, cover a shallow baking dish with foil and spray with cooking spray. Place pork on foil and bake at 350 degrees about 45 min. or until pork reaches 160 degrees.

Blackberry Sauce:

I started working on this while the grill was heating and it was done about the time we finished the pork. Couldn't resist a photo of the heat rising off the sauce! Yum!

Heat 2 tsp. olive oil (plus a little olive oil spray) in a skillet over medium heat. Mince shallot and sauté until mostly translucent. Increase to med-high, add wine and bring to a boil. Let liquid reduce a bit, stirring some to make sure the shallot isn't sticking to the pan.

While waiting for wine/shallot mixture to boil, wash blackberries, put in a bowl and mash easily with a potato masher (otherwise blackberry juice will spray everywhere!). I did it in the sink to avoid any blackberry juice stains. Another option is to purée them in the food processor and then strain them with a fine strainer to remove the seeds. For a thicker sauce, use the potato masher. I would equate the mashing with "coarsely chopping" (i.e. still lumpy).

Once the wine mixture has reduced some (let boil about 5-8 min.), add freshly squeezed lemon, lemon zest, fresh blackberries, blackberry jam, fresh thyme, sugar (note: omit sugar if not using sugar-free jam), a dash or two of salt and some black pepper. Stir everything together, allow the jam to mix in well, and reduce heat to medium or medium-low. Simmer uncovered for about 30 min. or until sauce thickens to desired consistency, stirring occasionally.

Top sliced pork with blackberry sauce.

Sauce Makes about 8 servings. Because of my desire to eat this dish immediately, I didn't figure out exactly how much it makes, but I estimate it has about that many servings, based on our leftovers. The pork probably serves 4.

Review:

As mentioned above, THIS DISH ROCKS. I will certainly be making it again. Our immediate reaction was that the rosemary on the pork was an awesome complement to the blackberry sauce, coupled with the fresh thyme in the reduction. The garlic flavor was better off on the pork vs. the sauce, but surprisingly also went well. And of course, the red wine flavor ROCKED. Definitely a great combination and one I will be repeating.

We generally bake our pork tenderloins, but I'm really glad we grilled this one. The grill gave it an awesome flavor boost, but I don't think it would be lacking if it's baked. The key would not to overcook it, because the juiciness in the pork added quite a bit.

Nutritional information:

Blackberry reduction: 86 calories, 1.3 grams of fat, 2.1 grams of fiber per serving. Makes 8 servings.

Pork tenderloin: 122 calories, 3 grams of fat, 0 grams of fiber per 3 oz. serving.

(Note: this is a point to pay attention to serving sizes, as a few slices is probably a few servings. A food scale comes in handy just to get an idea exactly how much your serving weights, to accurately count the calories or WW points).

Where's the inspiration?

As mentioned above, I initially got this idea from a blueberry recipe I read, although this recipe was nothing like that one. I searched quite a bit online for a blackberry sauce I could use, but had a terrible time finding a recipe that didn't call for butter. I didn't think this needed butter...I was able to find enough alternative flavor-boosting sources for much less calories. So, the recipe is somewhat inspired and adapted from this one.

Really though, a WW-friendly-cooking friend had made a similar reduction with figs, so I chatted with her about how she made the sauce and went from there. So thanks to her for the inspiration!

Enjoy!

Friday, April 17, 2009

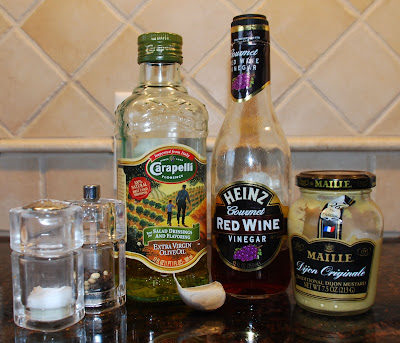
The Only Vinaigrette (Salad Dressing) You'll Ever Need

I'm not a huge fan of salad dressing. When I was a kid I generally ate salad without dressing or if I did use it, would lightly coat my salad with a tiny bit of ranch dressing. Odd, since most parents have to beg their kids to eat salad. Even though I will still eat salad that way, I generally like to give it a bit of a flavor boost, especially since I'm not into boring food and plain lettuce is about as boring as it gets.

In other words, a salad dressing has to be pretty darn good and full of flavor if I'm going to spend the calories on it, since most dressings are loaded in calories and fat.

Enter a vinaigrette recipe from a friend in France. Simple, flavorful, many varieties, and the only salad dressing I use, unless a dish specifically calls for something else. I'm no
t kidding, I love this recipe. I love that you can make it your own. I love the bold flavors. I love that it goes with all varieties of greens (and directly on tomatoes, which are a food group in my world). You won't believe how well it goes with red wine and goat cheese (but that salad recipe is for another post). I sometimes wish I could bring my own dressing to a restaurant. And I especially love that you don't need a lot to get the flavor, which makes it very Weight Watchers-friendly.

Quick and simple vinaigrette salad dressing:
  • 2 tsp. Dijon-style mustard (grainy or smooth mustard works. I often vary b/t the two. Only recommendation is NOT to use regular old American mustard...ick)
  • 3 Tbsp. Extra virgin olive oil (EVOO)
  • 2 Tbsp. Red wine vinegar
  • Salt & pepper
  • 1-2 cloves fresh crushed garlic (or 1-2 tsp. garlic powder)

Combine all ingredients in a small bowl and mix together as you would beat eggs. If dressing is a bit strong, add a small amount of water. Serve immediately over salad.
If refrigerated prior to serving, allow a few minutes for dressing to return to room temperature and stir again so it's properly mixed. Olive oil will harden in the refrigerator.

There are plenty of options to customize this recipe:
  • For less of a bold flavor, try salad (white wine) vinegar instead of red
  • Not a fan of garlic? Leave it out. I've made it plenty of times without and it's still great
  • Instead of garlic, mince a shallot to add (another variation from a friend in France...certainly worth trying!)
  • Substitute the vinegar to easily make other dressings (balsamic, fig, etc.)
Nutritional information:

The number of servings in this recipe depends on how much salad dressing you use. I estimate there are about 6-8 servings per recipe.

At 6 servings, there are about 70 calories and 7 grams of fat. With a little less dressing per serving it's more like 51 calories and 5 grams of fat. 0 grams of fiber.

You don't need a lot of this dressing to get the flavor.

Enjoy!

Monday, April 13, 2009

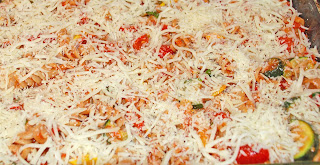
Roasted Vegetables and Whole Wheat Pasta Bake

Inspiration from Apple A Day’s blog, who adapted from Giada DeLaurentiis.

Ingredients:


2 small to medium zucchini, halved lengthwise and chopped (about 1.5 cups)
1 small or half a large yellow squash, quartered lengthwise and chopped (2- 2 1/2 cups)
1 ½ cups fresh mushrooms, c
oarsely chopped
1 cup grape or cherry tomatoes, ha
lved
1 small yellow or red onion, chopped (about ¾ cup)
3-4 cloves garlic, crushed and divided
2 ½ Tbsp. olive oil
Herbs de Provence (see notes),
ground, to taste
4 cups whole wheat penne or fusilli pasta
¼ cup whole wheat Italian style
bread crumbs, divided
2 ½ cups marinara sauce

1 ¼ cups low moisturized, part-skim shredded mozzarella cheese, divided
½ cup shredded parmesan cheese
2 Tbsp fresh cilantro or parsley, chopped
Salt and pepper to taste
Sprinkle red pepper flakes, to ta
ste

Directions:

  1. Preheat oven to 450 degrees. Line a shallow jellyroll pan with foil and lightly coat with olive oil spray.
  2. Chop vegetables and combine in a large bowl. Add olive oil, 1 crushed garlic clove, salt & pepper to taste, and herbs de provence to cover the vegetables. Stir until sufficiently coated with oil (should be light on the oil). Spread vegetables on prepared jellyroll pan and roast in the oven for about 15 min. or until tender.
  3. Meanwhile, bring a pot of water to boil and cook the pasta for about 6-8 min. and drain. Pasta should still be tough in the middle since it will bake in the oven.
  4. While the pasta is cooking, spray a 9x13 baking dish with olive oil spray. Add 2 Tbsp bread crumbs to bottom and shake to evenly distribute.
  5. In a large bowl, stir together the roasted vegetables and cooked pasta. Mix in marinara, additional 2-3 cloves crushed garlic, remaining 2 Tbsp bread crumbs, ½ cup mozzarella and cilantro/parsley. Add a dash of salt & black pepper to taste. Sprinkle in some crushed red pepper flakes for a bit of spice kick.
  6. Add entire pasta mixture to prepared 9x13 baking dish. Cover with remaining ¾ cup mozzarella and 1/3 cup shredded parmesan cheese. Top with freshly cracked pepper.
  7. Bake uncovered 25 minutes or until cheese is golden brown on top

Makes 8 servings. Approximately 7 WW points per serving.


Notes and review:

I meant to use red onion for this dish but they weren’t very good at the store and I had yellow in stock. Either will work fine, depending on your preference.

Herbs de Provence can sometimes be hard to find in the store. I usually purchase them in France, but have seen them in some stores. If you can’t find them, you can
mix your own.

I would have preferred to do a homemade marinara sauce with this but I didn’t have time. I recommend using a marinara with basil, as it added some great flavor. If using a sauce without basil, I would add 1-2 tsp. dried basil when mixing the pasta, vegetables and sauce together.

I had fresh cilantro in stock which ended up being an amazing flavor booster to this dish. I highly recommend using cilantro. Parsley can be common in Italian-style dishes, so is also a likely choice, especially since cilantro tends to be a “love it or hate it” kind of spice.

Overall this was a GREAT pasta dish. It would be perfect as a family dinner or even for a casual dinner party. Awesome flavors and the herbs de provence were a great addition to the roasted vegetables. The blog’s recipe I referenced at the top of this entry used bell peppers. I decided to substitute yellow squash since I had it on hand and love them with zucchini. Bell peppers would be a good substitution for another vegetable in the dish if someone doesn’t like one of the vegetables.

Enjoy!

~Chews Wisely

Wednesday, April 8, 2009

Crock Pot Stuffed Green Pepper Soup

The stuff:

1 lb extra lean ground beef

1 medium onion, diced (at least one cup)

2-3 tsp. dried basil

2-3 tsp. dried oregano

2 cloves garlic, crushed (can also use 2-3 tsp. minced jarred garlic)

1 (14.5 oz.) can diced tomatoes

2 cups chopped green peppers (generally two green peppers is enough)

1 (15 oz.) can tomato sauce

3-4 cups beef broth

¾ cup brown rice (not minute rice), uncooked

Pepper to taste


*I forgot to include the green peppers in this photo and then they didn't photograph well,

so don't forget to include them. :)


The execution:


Brown beef with onion over medium heat and place in the crock pot. Add the remaining ingredients and cook on low for 6-8 hours. *As shown, will be soupier at the beginning before the rice cooks.


Less beef broth will give it more of a chili consistency; adding more will make it soupier. I usually add 4 cups, but generally have a bit more than 1 lb of meat.


Can also be cooked on the stove – add all ingredients to a large pot and simmer for 1 hour.


Makes about 12 cups. 1 cup is approximately 3 WW points. I think it’s about 150 calories per serving but I wasn’t able to figure it out exactly.


Tips:


Some recipes say to cook the rice beforehand, but I wouldn’t recommend it, as it cooks just fine over time in the crock pot. I also add some ground-up herbs de provence and a few dashes of crushed red pepper flakes for a bit more flavor.


If you want to make it even leaner, cook the ground beef and onion separately and then drain and rinse the beef before adding to the crock pot. Since there are so many other flavors in this recipe, it won’t be lacking.


An additional variation would be to substitute barley for the rice.


I usually find the long grain brown rice it in the bulk section of the grocery store.

The beef broth can be done with pre-made beef broth or by making it with bullion cubes. I’ve done both with success.


The review:


Fantastic – great comfort food!


This has become one of our favorite meals. If you don’t love cooked green peppers (as my husband doesn’t), this soup is still worth a try. There are enough ingredients and flavors that the green peppers aren’t everything in the soup, but still have a presence.


I rarely made soup before coming across this recipe. Soup is generally not one of my favorite dishes but this particular soup has me wanting to make it again and again! Very flavorful AND filling for not a ton of calories.


It really doesn’t need much to round out the meal since it’s pretty sturdy on its own, but a bowl goes well with some crusty, whole grain bread.


Overall, it’s a great winter-time dish (or early spring when it’s still cold out, as it is here!).


If the amount of soup in this recipe is a lot, I still recommend making the full amount. It will cook the best in the crock pot that way. I’ve frozen part of a batch before and it worked well.


*Recipe originally inspired from a handout at a Weight Watchers meeting. Has been adapted quite a bit.

Sunday, April 5, 2009

Asparagus (with onion and ham) Pizza

-My own recipe!


The stuff:

  • ½ bunch of fresh asparagus, washed, woody ends removed
  • 1 small to medium onion, diced
  • 1 Tbsp olive oil
  • ½ - ¾ jar pizza sauce
  • 2 cloves garlic, crushed or 2-3 tsp. minced fresh jarred garlic
  • Crushed red pepper flakes to taste
  • 3-4 slices deli ham (vegetarians, see review)
  • ¾ cup part-skim shredded mozzarella cheese (or a reduced fat variety)
  • Freshly cracked pepper


The execution:

Preheat oven to 450. Heat 1 Tbsp olive oil in a frying pan on medium heat. I add a bit of olive oil spray to finish coating the pan. While oil is heating, cut asparagus into thirds and chop the onion. Add to pan and sauté until onions begin to brown or become translucent. Be sure not to overcook, as it will cook further once the pizza is assembled. Add some black pepper if desired.


Meanwhile, add desired amount of pizza sauce to a bowl and mix in the fresh garlic. Place the pizza crust on a pizza pan or stone. Can also be cooked directly on the oven rack for a crispier crust. Add the pizza sauce and spread evenly onto crust with the back of a spoon. For an extra spice kick, sprinkle red pepper flakes over the sauce.


Spread the cooked onion and asparagus evenly over the pizza. Tear up slices of deli ham and place on top of asparagus and onions. Cover the pizza evenly with cheese. This is one area to be careful of adding too many extra calories. I make sure to cover the pizza but don’t load it down with cheese, as there’s a lot of flavor in this recipe already. If I have some on hand, I’ll also mix in a bit of grated parmesan cheese.


If desired, add some freshly cracked pepper to the top before baking.


Bake at 450 for 10-12 minutes or until cheese is golden brown on top. Remove from oven and let cool for a few minutes before cutting into 8 slices.


The review:

Tasty! A good healthy option for pizza lovers! This is one of our absolute favorite weeknight meals. We’ve also had a few friends try it who weren’t sure about it at first (one was so-so on asparagus in general) and the ended up loving it!


I do consider it a “splurge” night since it is pizza, but is so much better than ordering out! This recipe is loosely based on a pizza I ordered on vacation, but I guarantee that one was NOT as healthy as this one. It had shredded pork, which was great, but not practical for a quick weeknight dinner, which was the goal for this meal. The deli ham adds a bit of saltiness to the onion and asparagus, which is a good combination but I’ve also done it without the ham and it’s still good – A nice option for vegetarians (consider adding a bit of salt to the cooking asparagus and onion).


Another way I’ve seen asparagus done on pizza is with goat cheese. Goat cheese happens to be one of my favorite food items ever, but again, it’s not practical for a common weeknight dinner. However, I may come up with a goat cheese combination and add as an alternative at a future date…which would certainly be a splurge night, since it’s pretty much a requirement that one include a glass of red wine to accompany goat cheese!


Nutritional bit:

Per pizza slice (approximate…I’m not making promises on potentially bad math!):

172 calories

6.25 grams of fat

4.25 grams of fiber


It works out to be about 3 WW points per slice. This really depends on the amount of oil and cheese used. If you use more than ¾ cup cheese or use a bit more oil or deli ham, I’d count it as 4. Not bad for pizza!


In other words, this is a meal where portion control is a must but is a great option for pizza lovers!


Notes:

Instead of using a store bought crust, one could also make homemade whole wheat pizza dough. I’ve done this on occasion, although not with this topping combination. The pre-made one is a good option for a quick weeknight meal. I plan to make and review one later, but I have used this recipe from allrecipes.com in the past for whole wheat pizza dough, and it’s worked pretty well.


How to make this a complete meal?

Since having only one slice is incredibly difficult and not practical, I stick with very low-calorie options as side items for this dinner. We generally have grapes or some sort of fruit. If we need something else, a mixed green salad with some chopped tomatoes and cucumbers with vinaigrette dressing is a good option.


Enjoy!


~Chews Wisely

Thursday, April 2, 2009

Welcome! Let's get cooking!

Welcome to Chews Wisely!

I've been thinking about starting a blog for quite some time and have finally decided to take the plunge. There are a number of blogs I follow on a regular basis, both work and hobby-related (mainly cooking, home renovation and anything related to Paris and/or France), but my own hesitancy in starting a blog has been rooted in the fact that, well, in my opinion, a blog needs a theme. What did I have to share with the online community? Do I really have the extra time and energy to put into this task? The few people to whom I've mentioned I'm starting a blog weren't 100% sure I do have the time to commit to this, but they've all been positive and excited about the topic, so here it goes.


This blog will be dedicated to cooking, eating and living a healthy lifestyle; mainly a Weight Watchers lifestyle. My goal is to share a bit about my journey, but mainly to make this a resource for some awesome recipes and meals that are a world away from tasting like cardboard (I'm not a boring eater, so I'd better not be a boring cook!) and tips for sticking with a healthy way of life. You really can eat healthy and still have tasty food in your life - hopefully this blog will help others achieve that. I will try to include the points value for recipes as much as I can. From time-to-time I may also blog about home renovations. My husband and I spent an entire summer gutting and completely redoing our kitchen (with the help of some very dedicated family members) and we will be embarking on a basement bathroom soon. I will say that after the amount of work that went into the kitchen, I have put a lot of effort into making sure it gets some good use!


About me: I am a relatively newlywed 20-something girl from the Midwest who lost 55+ pounds through Weight Watchers and became a member of the lifetime crowd in December 2008. I never in a million years thought something like this was possible. I now weigh less then I did when I was a freshman in high school. I'm not kidding. And I only joined the program after I saw my mom and my sister have success over a summer. I must admit, I was still reluctant the day I walked in there and might have turned around and walked out if our leader was the fake, cheery, rah-rah type, but she turned out to be tough, down-to-earth and wasn't going to tell me I could never again have a beer or glass of wine. So I stayed. And I'm glad I did. That was late August 2007 and I haven't looked back.


I really have had a mental shift since joining Weight Watchers, and it truly has become a way of life for me. Before I joined I worked out regularly and cooked in a fairly healthy manner, but I had always been overweight. I was active in my youth and I don't have overweight parents, so who knows what was up...BUT, the top ten fundamental changes to my adult lifestyle include:

  1. I no longer waste calories on stuff that's not my favorite (i.e. potato salad at a grill out. Don't love it, don't hate it. I just choose not to eat it anymore and use my points on something else). In other words, it has to be a 10.
  2. Portion sizes. Before WW, I hadn't really given them much thought. This is a very helpful thing of which to be aware...it's amazing how big our portions sizes can be, both at home and in a restaurant! Measuring things at the beginning was very helpful.
  3. Eating out. I really changed the way I eat out. I'm not afraid to ask for a to-go box at the beginning of the meal and pack up half of it right away to bring home (which is a nice perk for my husband...he gets lots of yummy leftovers!). Again, I pick times I'm going to splurge on my favorite things and don't get them all the time. I really like seasoned kettle chips. But I now only get them at one of my favorite restaurants, where I know they're going to be good. I also used to order buffalo wings a lot. Come on, they go so well with beer! There's one brew pub nearby that has a great buffalo chicken sandwich that's grilled and served with bleu cheese crumbles instead of dressing. That's where I go when I want that. I'm also not afraid to ask for a breaded chicken breast to be grilled instead, and always ask them to leave the butter off buns, etc.
  4. Ordering in a restaurant. I think this deserves its own number. I have become Sally from the movie When Harry Met Sally and I'm not apologetic about it at all. I'll be honest. It bothered me at first, but after I thought about it more I decided that was dumb. We have a choice what we put in our bodies, and there shouldn't be shame in asking for what we want. I'm nice about it, but I am no longer afraid to send back something if they say they can cook it in a special manner and don't. As this blog continues, I'll share more about how I order in a restaurant. If I do it now, this will never end. Just ask my husband. He laughs under his breath every time I order. Good thing I don't talk quietly. My order carries across the table in a loud restaurant just fine. ;)
  5. Working out. It has to be part of any weight loss routine. Getting active is really an important part of life. It's just that before I thought this was the biggest part of the equation. While it's important, it's not everything. As mentioned, I was always fairly active. I've generally gone to the gym and I love to swim and golf. I just really learned this has to be paired with eating right. It won't do it alone.
  6. Meal planning and grocery shopping. I can't tell you how important this is. I now grocery shop at the same time every week. Before, my shopping was extremely sporadic. Not only has this helped me get organized about what I'm buying, I also save money, because I hit sales at the right time (especially on meat and fresh food). I also plan ahead on what meals to cook and cook a few things that we eat over the course of the week. This cuts down on the last-minute, "oh, let's get takeout from ____" on busy days. When there's something on hand to heat up quickly, that excuse doesn't work. The crock pot has become my best friend. I'm sure at some point during the life of this blog, I will elaborate on my obsession with my crock pot. Seriously, I am in love with my crock pot.
  7. Always ask to bring something. Besides the fact that it's polite, when there's a social gathering, ask what you can bring or just show up with food. That way you know there is something there you can munch on with everyone else. A few easy favorites are a bag of fat free pretzels, hummus with whole wheat pita bread, a fruit or veggie tray or even tortilla chips and salsa. I have some yummy party friendly appetizers I'll share too.
  8. Learning to say no. I wasn't always very good at this. I no longer feel obligated to eat something just because someone is pushing me to do so. And when I do have something, I can refuse seconds, or take a very small portion at the beginning. Splitting things with someone else is also helpful. And when a certain restaurant just isn't fitting in my plan for the week, sometimes I just decline (sorry if you've been on the receiving end of this. I really do want to go, since this is a fun, relaxing thing for me...I've just had to learn to take care of myself when needed).
  9. Water, water, water! Keeping hydrated is very important. Drink water throughout the day. When starving, I always start with a big glass of water, which really helps take off the edge.
  10. Ask for help. Before joining WW, I had the attitude that I could do it myself. And I always did manage to get started...I lost about 10 lbs before walking in the door of WW. But that's usually as far as it went. I thought group meetings were dumb. I didn't realize how much I'd learn from other people and thought it would be rather patronizing. It wasn't that way at all and I'm so glad I got over it. The people around me have really supported me...my husband, my immediate family, my in-laws and extended family, my friends, my boss, other "co-workers" (too complicated to explain, but you know who you are). I couldn't have done it without you.

So, I hope this blog will be inspiring to someone out there needing a bit of a kick start or the encouragement to stick with a healthy lifestyle. And if nothing else, maybe someone will enjoy some yummy food. Or I'll finally be able to share the recipes I've been promising some people (especially my mother-in-law, who is patiently waiting for some crock pot recipes!).


I'm certainly someone who lives to eat doesn't eat to live. So that's me. Welcome to my blog.


And lastly, I have to give credit where credit is due, so I hope everyone read to this point! Thank you so much to my boss' husband, who came up with the name for this blog. It's thanks to him that I'm finally getting started. I couldn't for the life of me think of a clever name and he has quite the knack for things like this...I'm told this took him all of 10 seconds to create. So thanks to him...let the cooking begin!


~Chewing wisely